Ingesting Protobuf Messages into Apache Druid
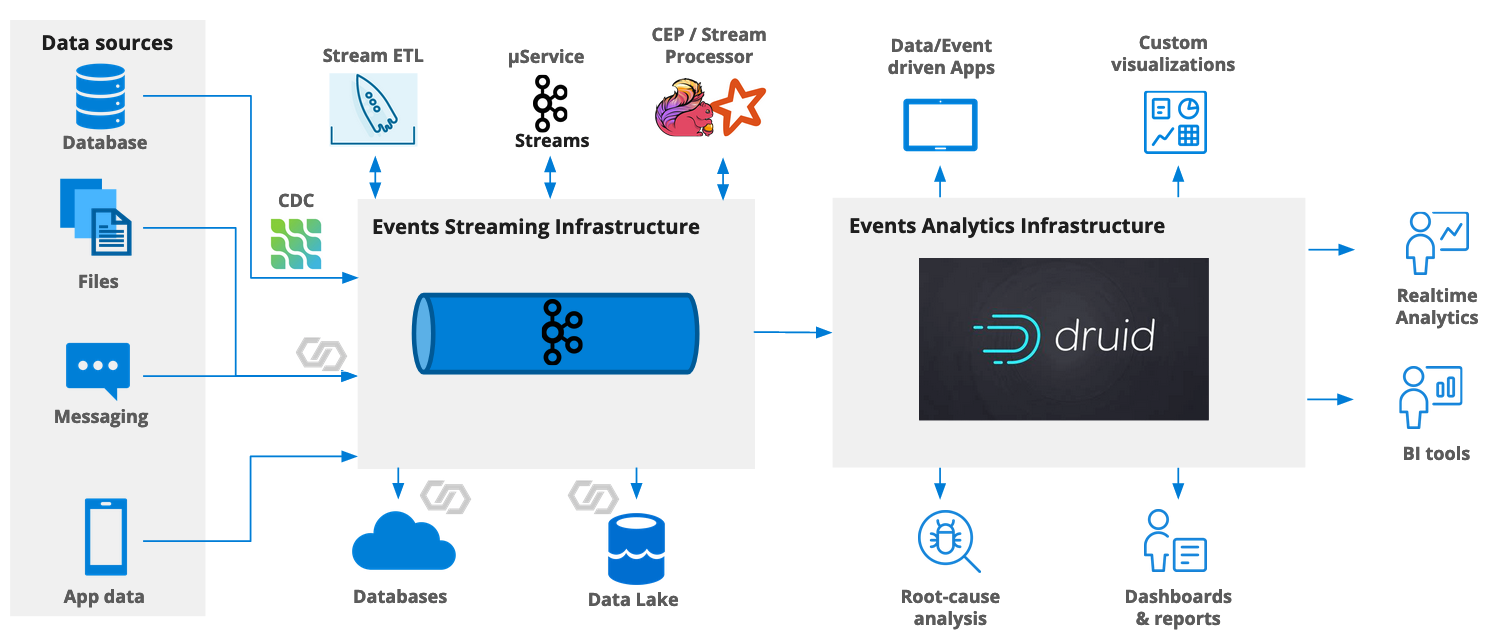
Since version 0.22, Druid supports reading Protobuf data from a Kafka stream. Let’s look at this in practice.
This exercise uses the Druid 0.22.1 micro-quickstart setup.
We are going to:
- Set up Kafka and Confluent Schema Registry in local Docker containers
- Set up a data generator for Protobuf data using Kafka Connect
- Run a local Druid instance
- Configure Druid to ingest Protobuf data from the live stream.
Let’s get going!
Generating Data with Kafka and Kafka Connect
There are various ways to create Protobuf data and stream them into Druid:
- One method is described in the Protobuf extension documentation, involving a custom Python script.
- There’s also this blog, which shows how to do it in Java.
- The easiest way would be to use Confluent Cloud - I described this in my post about AVRO integration. Instead of AVRO data, choose to generate Protobuf. You will also have to set up security in Druid according to the instructions in that post.
Because I did the Confluent Cloud version before, I am going to look at a different way using Confluent Platform and Kafka Connect locally. We will need to set up a few things to make this work.
Setting up Kafka in Docker
In order to generate data and stream them through Kafka, I am going to use the Community Edition of Confluent Platform, loosely following Confluent’s quickstart instructions, but starting up only the components we need.
First, let’s download the docker compose file for the Community Edition.
curl --silent --output docker-compose.yml \
https://raw.githubusercontent.com/confluentinc/cp-all-in-one/7.0.1-post/cp-all-in-one-community/docker-compose.yml
Alternatively, you can clone the entire repository.
Remove all the containers that we are not going to need. This includes everything KSQL, and the REST Proxy.
If you try to start this version alongside Apache Druid, you will notice that some of the same port numbers that Confluent Platform wants to use are also claimed by Druid. Fortunately, this is easy to fix. Using a text editor of your choice, replace each of the offending port numbers by a free port. Here’s my list.
| Service | Standard port | Custom port |
|---|---|---|
| Zookeeper | 2181 | 12181 |
| Schema Registry | 8081 | 18081 |
| Kafka Connect | 8083 | 18083 |
In addition to this, you will need to add an option to override the default REST port for Kafka Connect:
  connect:
    ...
    environment:
      ...
      CONNECT_REST_PORT: 18083
      ...
Note down the port numbers that you assigned, because you will need them later. This is the full docker compose file:
---
version: '2'
services:
  zookeeper:
    image: confluentinc/cp-zookeeper:7.0.1
    hostname: zookeeper
    container_name: zookeeper
    ports:
      - "12181:12181"
    environment:
      ZOOKEEPER_CLIENT_PORT: 12181
      ZOOKEEPER_TICK_TIME: 2000

  broker:
    image: confluentinc/cp-kafka:7.0.1
    hostname: broker
    container_name: broker
    depends_on:
      - zookeeper
    ports:
      - "29092:29092"
      - "9092:9092"
      - "9101:9101"
    environment:
      KAFKA_BROKER_ID: 1
      KAFKA_ZOOKEEPER_CONNECT: 'zookeeper:12181'
      KAFKA_LISTENER_SECURITY_PROTOCOL_MAP: PLAINTEXT:PLAINTEXT,PLAINTEXT_HOST:PLAINTEXT
      KAFKA_ADVERTISED_LISTENERS: PLAINTEXT://broker:29092,PLAINTEXT_HOST://localhost:9092
      KAFKA_OFFSETS_TOPIC_REPLICATION_FACTOR: 1
      KAFKA_TRANSACTION_STATE_LOG_MIN_ISR: 1
      KAFKA_TRANSACTION_STATE_LOG_REPLICATION_FACTOR: 1
      KAFKA_GROUP_INITIAL_REBALANCE_DELAY_MS: 0
      KAFKA_JMX_PORT: 9101
      KAFKA_JMX_HOSTNAME: localhost

  schema-registry:
    image: confluentinc/cp-schema-registry:7.0.1
    hostname: schema-registry
    container_name: schema-registry
    depends_on:
      - broker
    ports:
      - "18081:18081"
    environment:
      SCHEMA_REGISTRY_HOST_NAME: schema-registry
      SCHEMA_REGISTRY_KAFKASTORE_BOOTSTRAP_SERVERS: 'broker:29092'
      SCHEMA_REGISTRY_LISTENERS: http://0.0.0.0:18081

  connect:
    image: cnfldemos/kafka-connect-datagen:0.5.0-6.2.0
    hostname: connect
    container_name: connect
    depends_on:
      - broker
      - schema-registry
    ports:
      - "18083:18083"
    environment:
      CONNECT_BOOTSTRAP_SERVERS: 'broker:29092'
      CONNECT_REST_ADVERTISED_HOST_NAME: connect
      CONNECT_REST_PORT: 18083
      CONNECT_GROUP_ID: compose-connect-group
      CONNECT_CONFIG_STORAGE_TOPIC: docker-connect-configs
      CONNECT_CONFIG_STORAGE_REPLICATION_FACTOR: 1
      CONNECT_OFFSET_FLUSH_INTERVAL_MS: 10000
      CONNECT_OFFSET_STORAGE_TOPIC: docker-connect-offsets
      CONNECT_OFFSET_STORAGE_REPLICATION_FACTOR: 1
      CONNECT_STATUS_STORAGE_TOPIC: docker-connect-status
      CONNECT_STATUS_STORAGE_REPLICATION_FACTOR: 1
      CONNECT_KEY_CONVERTER: org.apache.kafka.connect.storage.StringConverter
      CONNECT_VALUE_CONVERTER: io.confluent.connect.protobuf.ProtobufConverter
      CONNECT_VALUE_CONVERTER_SCHEMA_REGISTRY_URL: http://schema-registry:18081
      CONNECT_PLUGIN_PATH: "/usr/share/java,/usr/share/confluent-hub-components"
      CONNECT_LOG4J_LOGGERS: org.apache.zookeeper=ERROR,org.I0Itec.zkclient=ERROR,org.reflections=ERROR
Now, run
docker-compose up -d
to fire up Kafka and Kafka Connect.
You can check the deployment with the docker ps command. Or query the Kafka metadata using kcat:
kcat -b localhost:9092 -L
If Kafka is up and running, this will return a list of topics and partitions.
Deploying the Datagen Connector
Kafka Connect comes with a built in data generator that can deliver various sets of mock data. We are going to use the Clickstream data generator, which emulates page clicks on a web site.
In addition to the data generator type, Kafka Connect lets us specify the output format using the value.converter property.
Let’s deploy the Connector configuration through the Connect REST API:
curl -X POST -H "Content-Type: application/json" --data '{
  "name": "datagen-protobuf-clickstream",
  "config": {
    "connector.class": "io.confluent.kafka.connect.datagen.DatagenConnector",
    "kafka.topic": "clickstream",
    "quickstart": "clickstream",
    "key.converter": "org.apache.kafka.connect.storage.StringConverter",
    "value.converter": "io.confluent.connect.protobuf.ProtobufConverter",
    "value.converter.schemas.enable": "false",
    "value.converter.schema.registry.url": "http://schema-registry:18081",
    "max.interval": 1000,
    "iterations": 10000000,
    "tasks.max": "1",
    "transforms": "SetSchemaMetadata",
    "transforms.SetSchemaMetadata.type": "org.apache.kafka.connect.transforms.SetSchemaMetadata$Value",
    "transforms.SetSchemaMetadata.schema.name": "clickstream"
  }
}' http://localhost:18083/connectors
Test the generator:
% kcat -b localhost:9092 -C -t clickstream -c 3

122.203.236.246-"679301(??)2#GET /site/user_status.html HTTP/1.1:407B14096J-RHMozilla/5.0 (compatible; Googlebot/2.1; +http://www.google.com/bot.html)

122.168.57.222
-"679311(??)2GET /site/login.html HTTP/1.1:406B4006J-RHMozilla/5.0 (compatible; Googlebot/2.1; +http://www.google.com/bot.html)

111.245.174.111$-"679321(??)2#GET /site/user_status.html HTTP/1.1:200B4006J-RHMozilla/5.0 (compatible; Googlebot/2.1; +http://www.google.com/bot.html)
This looks good! We are generating Protobuf data.
We have also added the data schema to Schema Registry, which will become important in a moment. (That’s why the schema registry information is in the REST call above.)
Let’s move on to Druid.
Setting up Druid
Download and install Druid, as described in the Quickstart tutorial.
Configuring the Protobuf extension
In order to parse Protobuf messages, you first have to enable the Protobuf extension in the Druid configuration. For the micro-quickstart configuration, edit conf/druid/single-server/micro-quickstart/_common/common.runtime.properties:
druid.extensions.loadList=["druid-hdfs-storage", "druid-kafka-indexing-service", "druid-datasketches", "druid-parquet-extensions", "druid-protobuf-extensions"]
Download the missing JAR files according to the documentation. If you skip this step, you will get weird and cryptic errors.
cd extensions/
mkdir protobuf-extensions
cd protobuf-extensions
curl -O -L https://packages.confluent.io/maven/io/confluent/kafka-protobuf-provider/6.0.1/kafka-protobuf-provider-6.0.1.jar
curl -O -L https://repo1.maven.org/maven2/org/jetbrains/kotlin/kotlin-stdlib/1.4.0/kotlin-stdlib-1.4.0.jar
curl -O -L https://repo1.maven.org/maven2/com/squareup/wire/wire-schema/3.2.2/wire-schema-3.2.2.jar
Ingesting Protobuf Data from Kafka
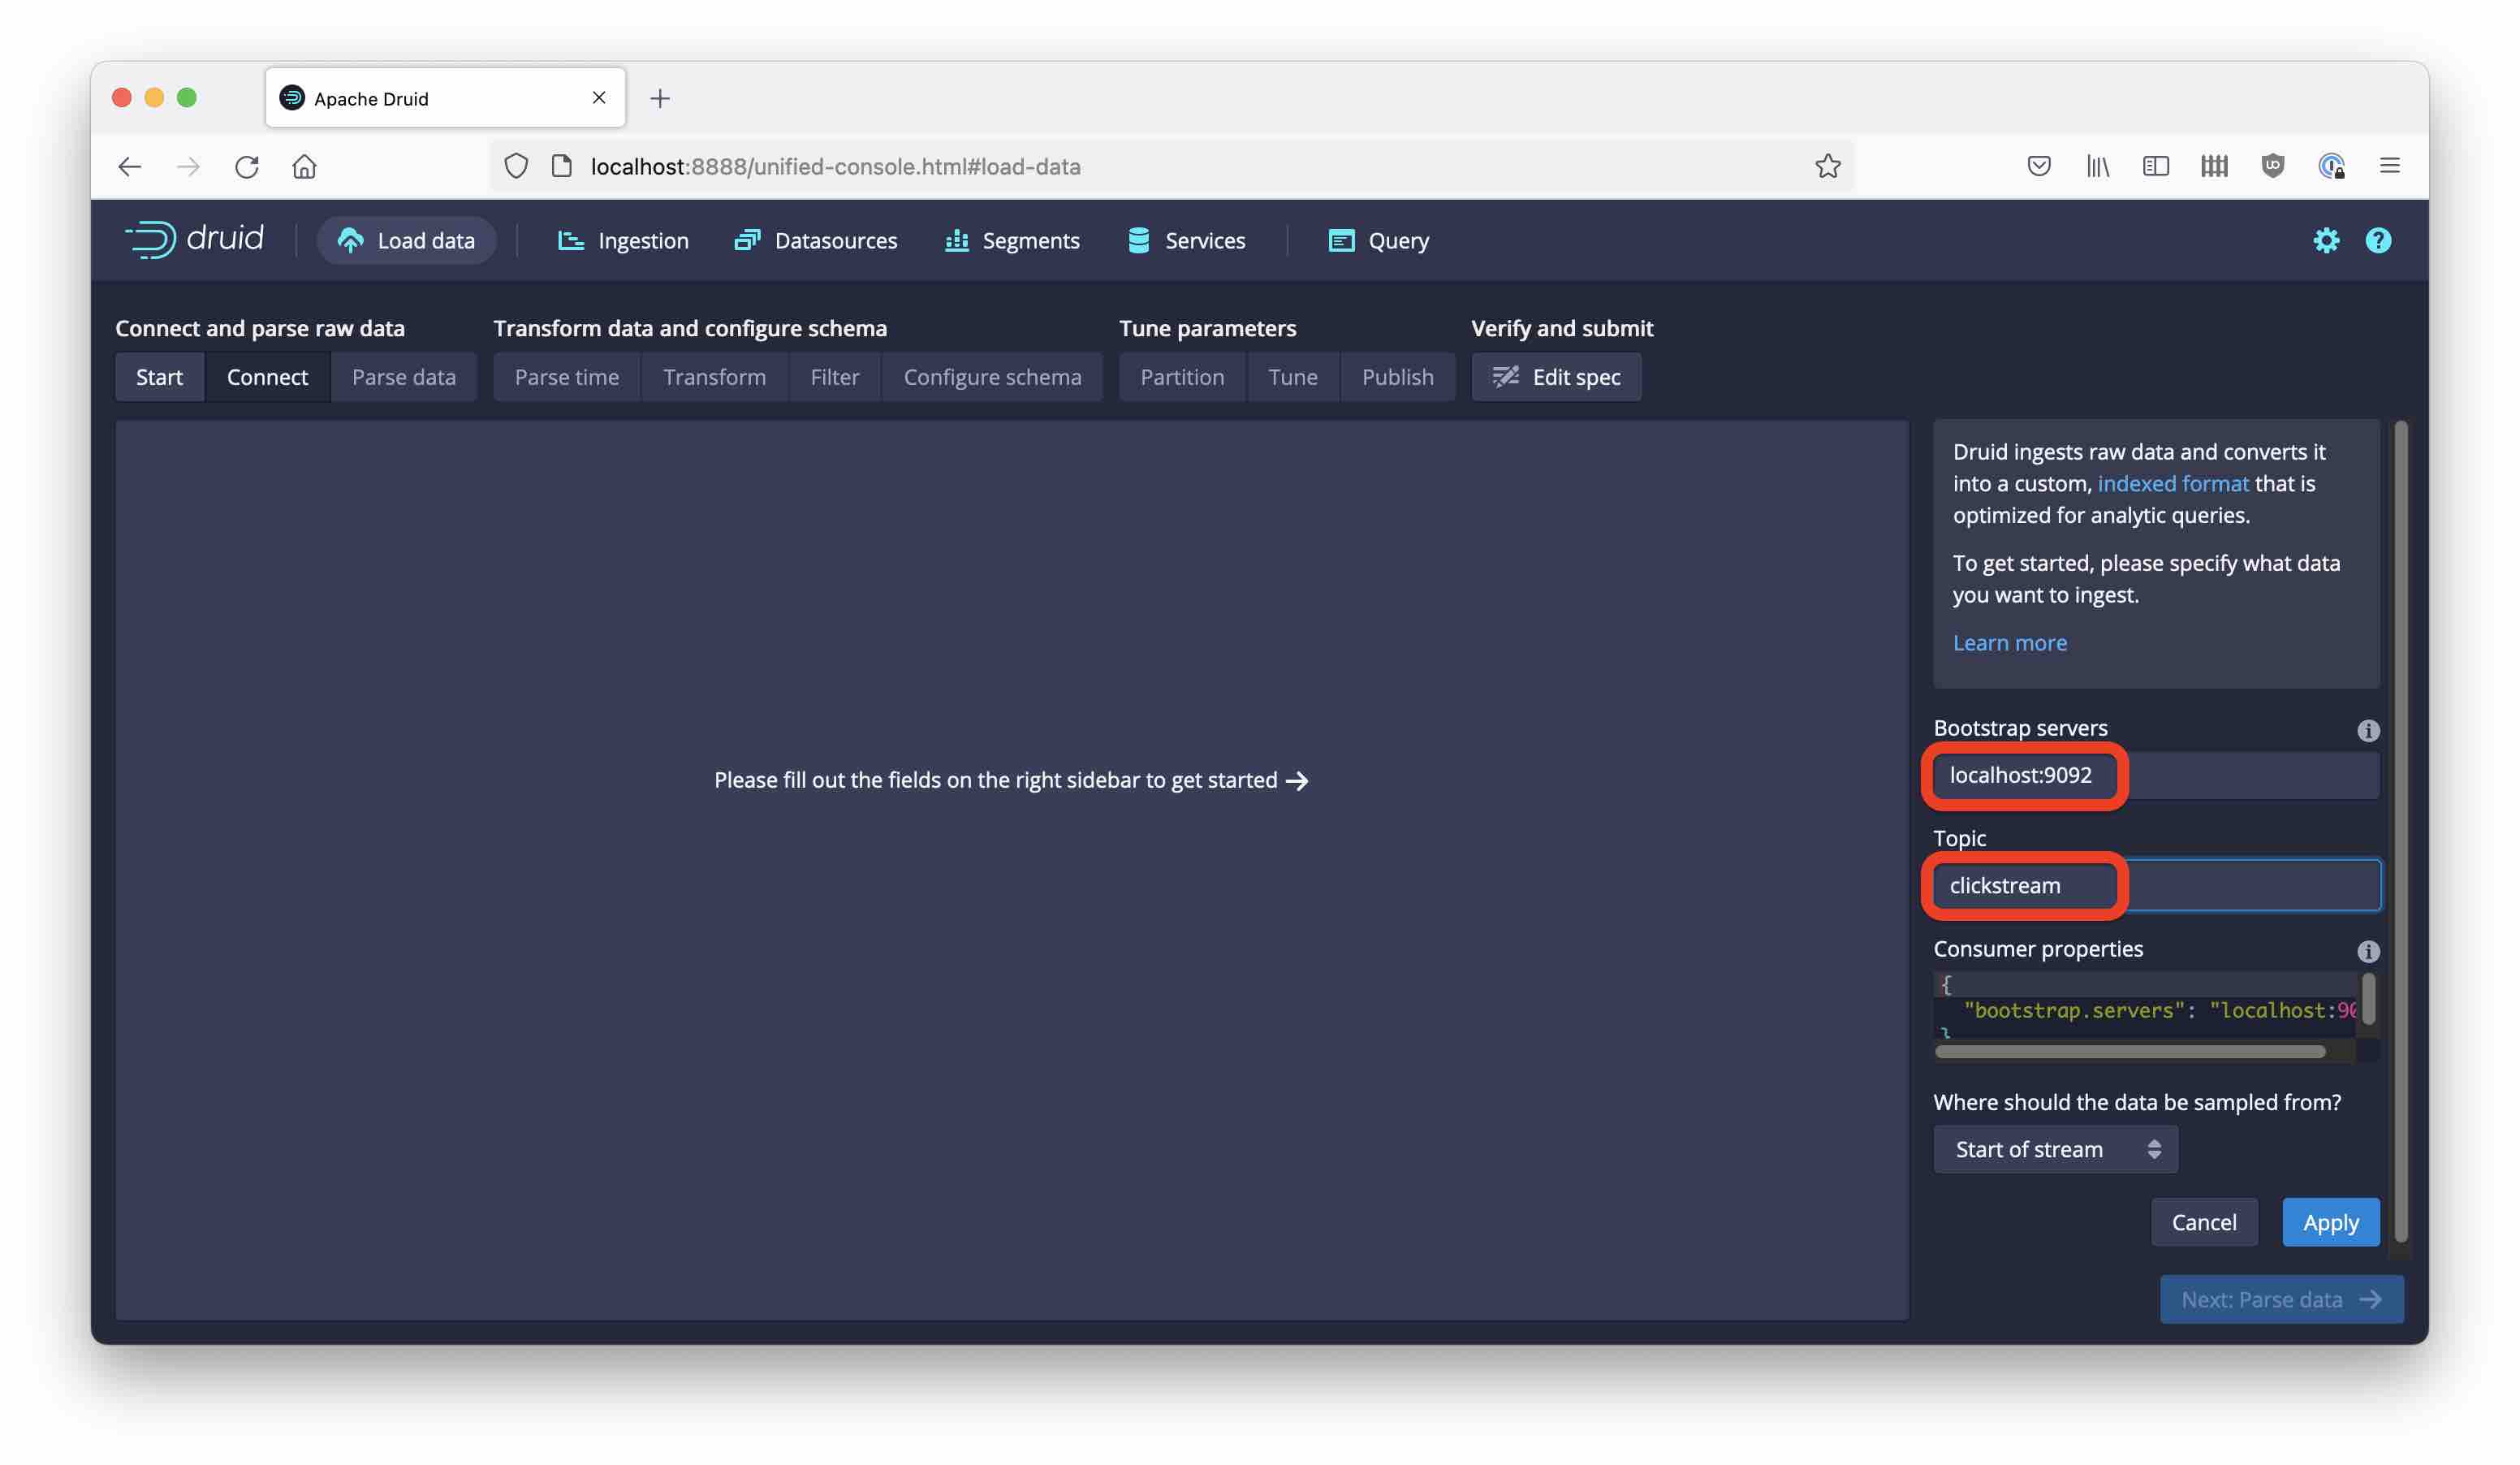
Start the Load Data wizard, and choose Kafka as the source. Enter the local Kafka coordinates as shown:
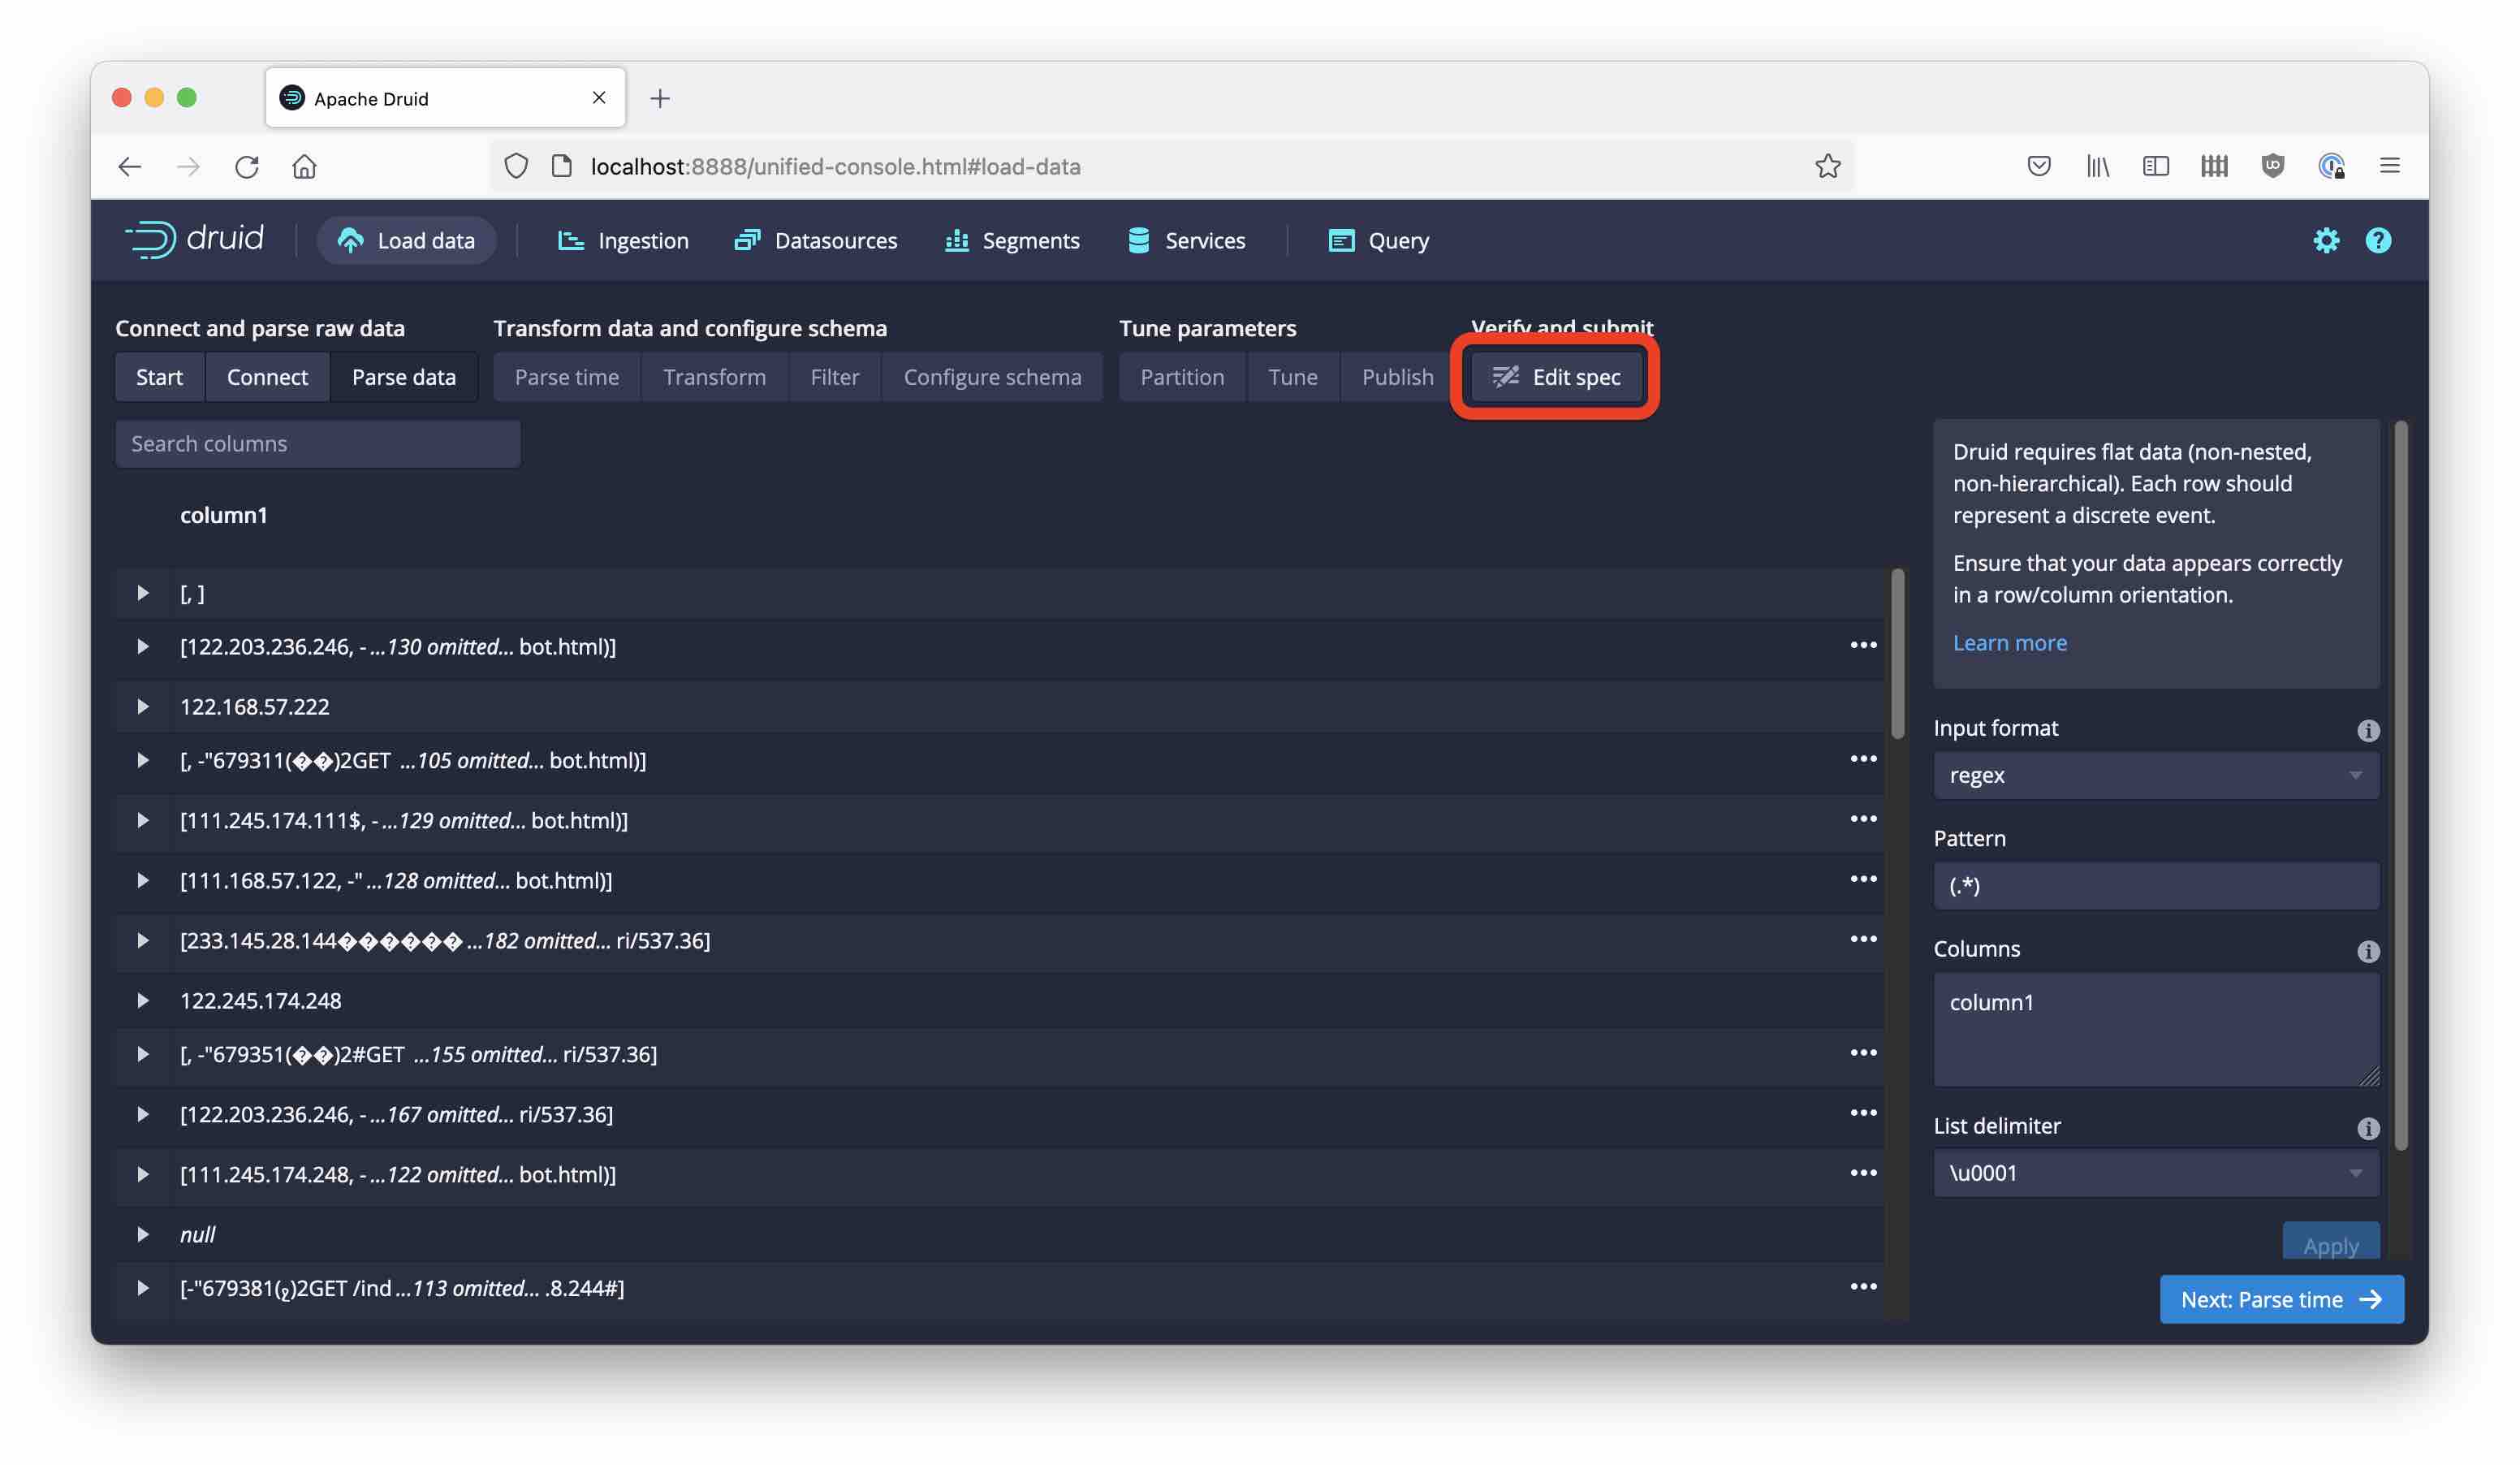
Then hit Next. You see what we would expect: garbled binary data. Here you would normally choose a parser. Since the Protobuf parser is not (yet) available as a drop-down choice, go directly to the Edit spec stage:
In the JSON editor, replace the "inputFormat" section:

Here is the replacement section.
      "inputFormat": {
        "type": "protobuf",
        "protoBytesDecoder": {
          "type": "schema_registry",
          "url": "http://localhost:18081"
        }
      }
This does two things: It specifies the format as Protobuf, and also tells Druid to get the metadata information from Schema Registry. The beauty of this is that the Kafka Protobuf message format encodes the schema ID as part of the message, so the right schema is looked up automatically!
Side note: There’s another way of injecting the schema information into Druid: by using "type": "file" in "protoBytesDecoder". In that case, you have a hardcoded schema and there is no schema ID in the message format. This is actually a different binary format!
Side note 2: If you had authentication enabled for your Schema Registry, you would have to add the credentials like so:
          "config": {
            "basic.auth.credentials.source": "USER_INFO",
            "basic.auth.user.info": "<SCHEMA REGISTRY API KEY>:<SCHEMA REGISTRY SECRET>"
          }
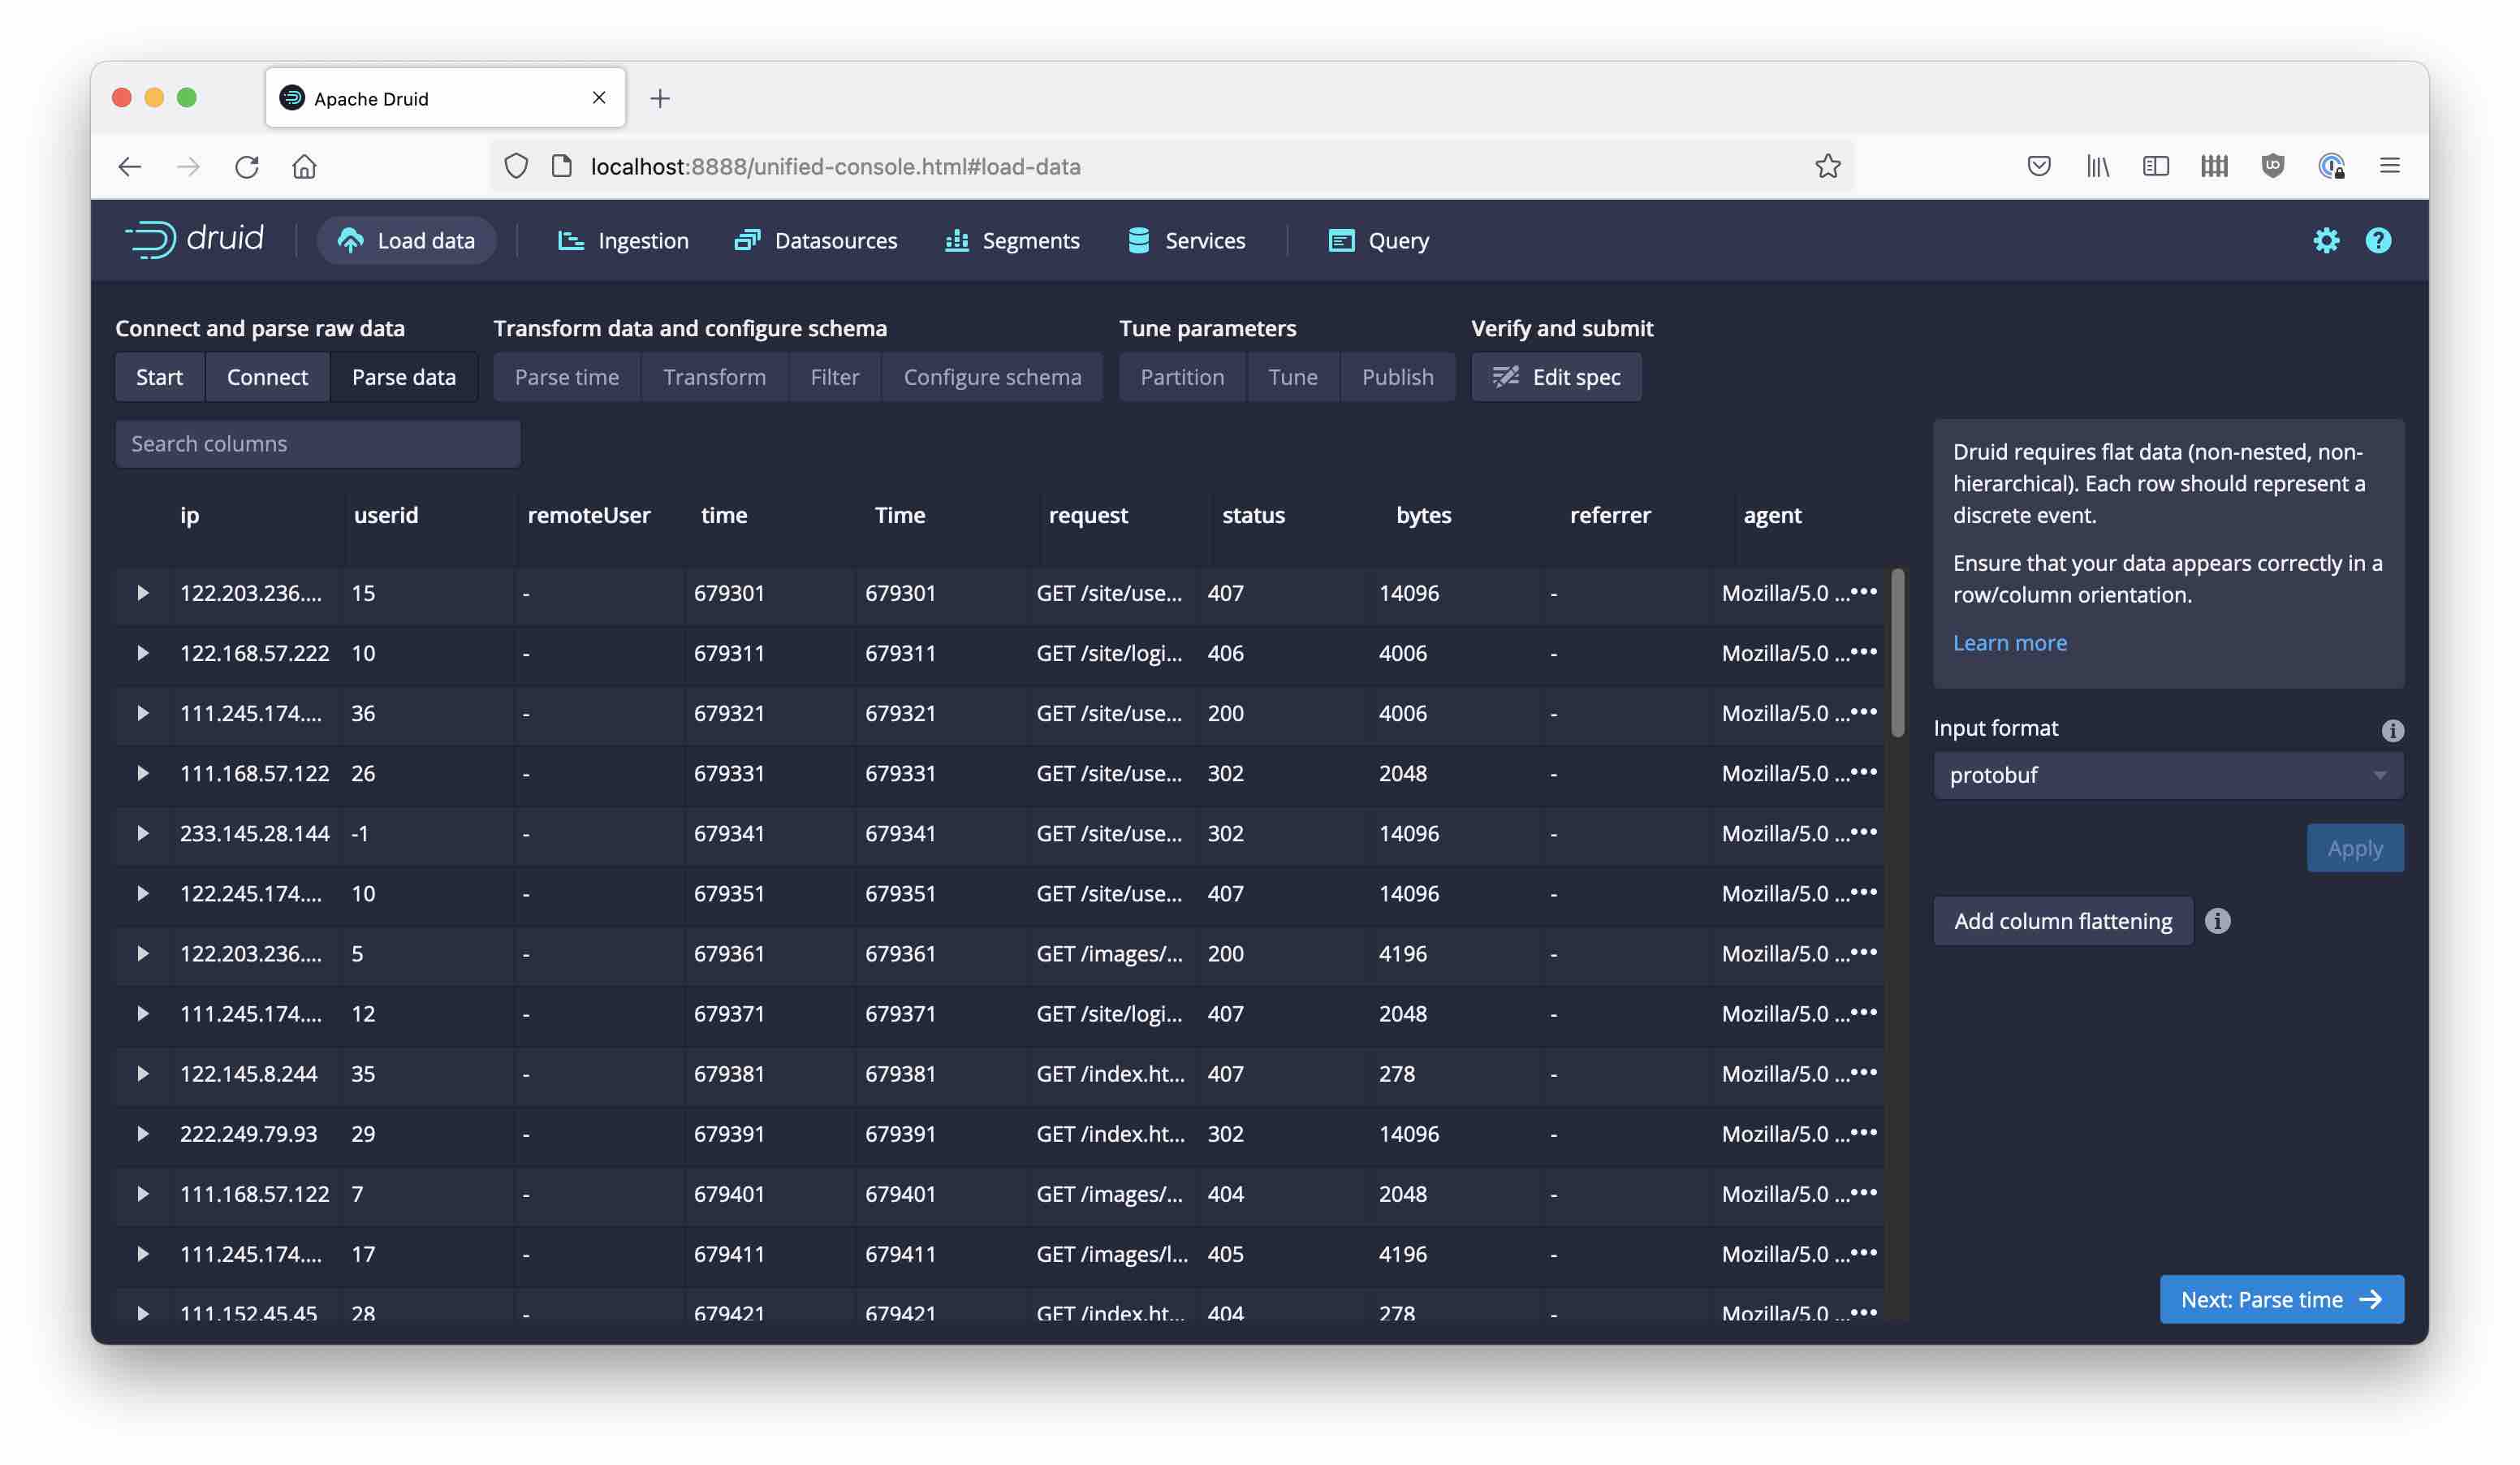
Now, go back the the Parse data stage and the data is appearing properly:
From here, it’s the standard procedure for the ingestion wizard:
- choose
timeas the timestamp field, inposixformat (this will show dates from 1970 but that doesn’t matter for the tutorial) - choose daily segments and earliest offsets
- name the datasource
clickstream-proto - and kick off the Supervisor
Here is the full ingestion spec:
{
  "type": "kafka",
  "spec": {
    "ioConfig": {
      "type": "kafka",
      "consumerProperties": {
        "bootstrap.servers": "localhost:9092"
      },
      "topic": "clickstream",
      "inputFormat": {
        "type": "protobuf",
        "protoBytesDecoder": {
          "type": "schema_registry",
          "url": "http://localhost:18081"
        }
      },
      "useEarliestOffset": true
    },
    "tuningConfig": {
      "type": "kafka"
    },
    "dataSchema": {
      "dataSource": "clickstream-proto",
      "timestampSpec": {
        "column": "time",
        "format": "posix"
      },
      "dimensionsSpec": {
        "dimensions": [
          "ip",
          {
            "type": "long",
            "name": "userid"
          },
          "remoteUser",
          {
            "type": "long",
            "name": "time"
          },
          {
            "type": "long",
            "name": "Time"
          },
          "request",
          {
            "type": "long",
            "name": "status"
          },
          {
            "type": "long",
            "name": "bytes"
          },
          "referrer",
          "agent"
        ]
      },
      "granularitySpec": {
        "queryGranularity": "none",
        "rollup": false,
        "segmentGranularity": "day"
      }
    }
  }
}
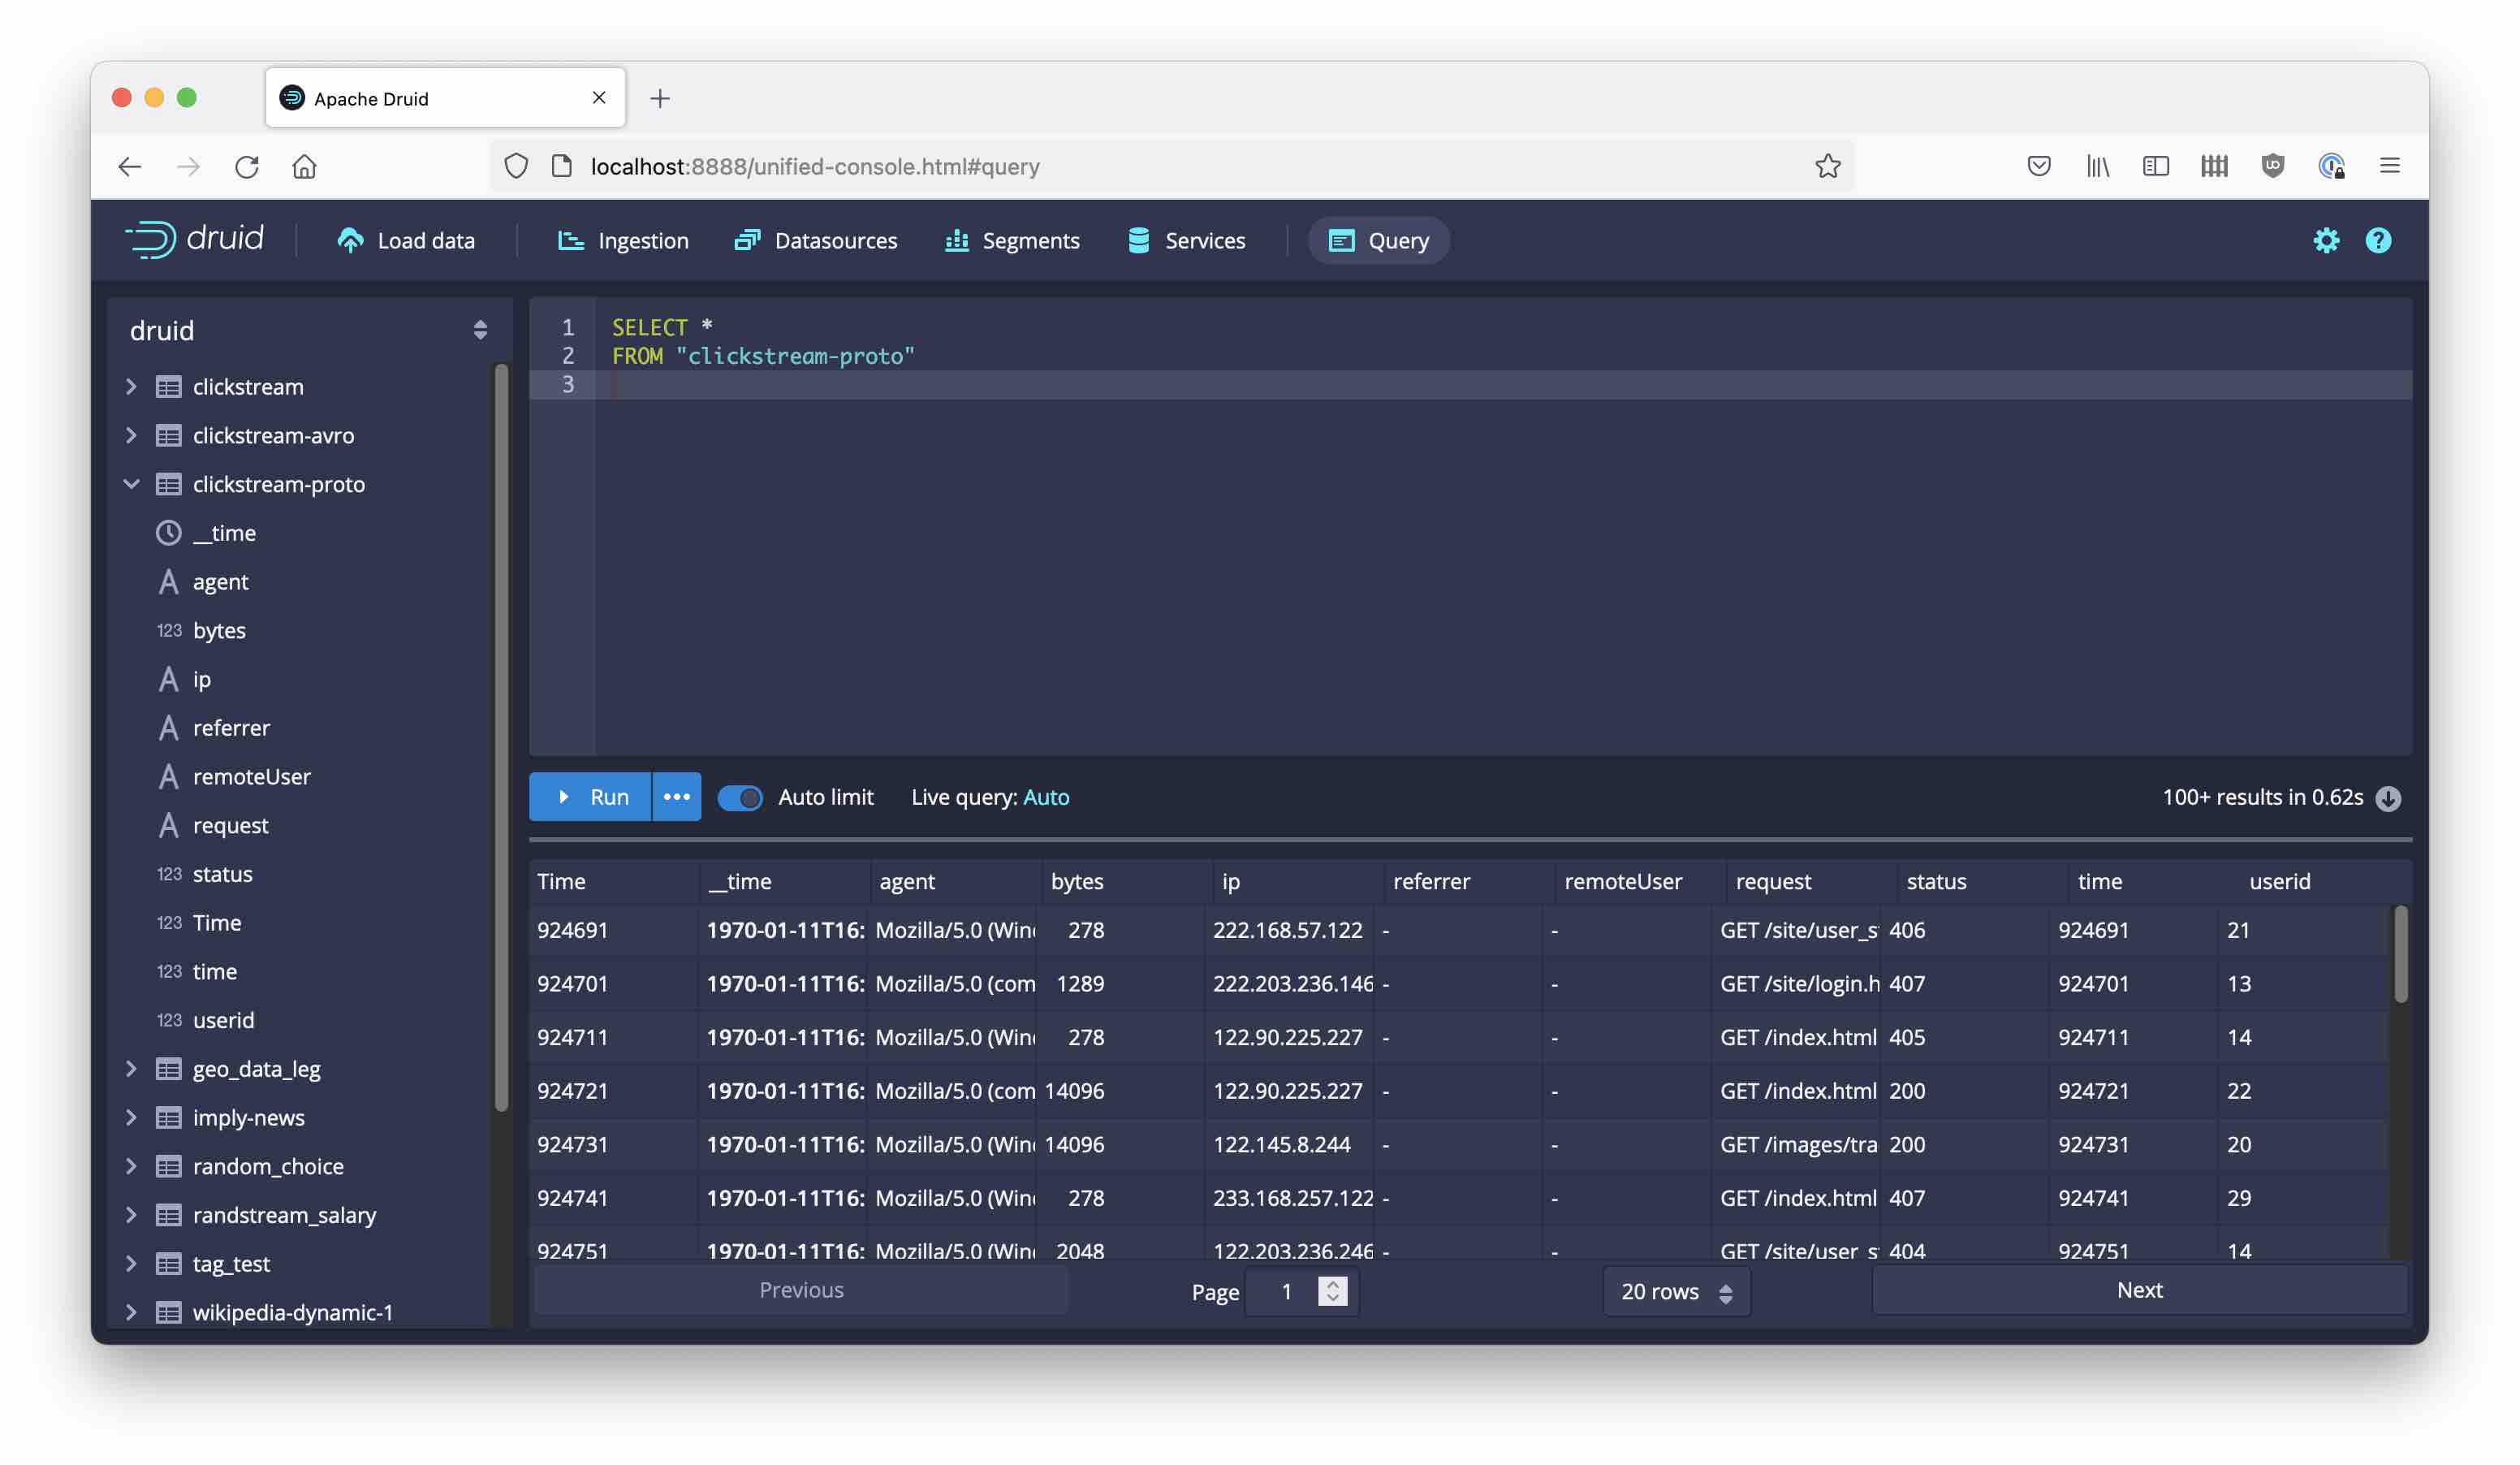
Soon you will see data showing up in the new datasource:
Learnings
- Protobuf format is fully supported by a standard Druid extension.
- As of the time of this writing, you need to add some libraries to Druid manually.
- The Protobuf support options are not visible in the Load Data wizard, but they can be accessed by editing the JSON spec directly.
- The Protobuf extension supports reading the Confluent wire format with a Schema Registry connection, or raw Protobuf with a schema file.